


Add another medium to your ever-expanding checklist repertoire
We’ve already shown you how to create a Google Sheets checklist, and now, why not add an additional program to your checklist repertoire and learn how to create a Microsoft Excel checklist?

Checklists are a great tool for optimizing efficiency and improving productivity. They are especially great for ensuring you don’t forget an important task or valuable item. All you essentially need to create a checklist is a piece of paper and a pen. But knowing how to create one using other mediums can be a pretty cool skill to have.
Creating a checklist through Microsoft Excel requires utilizing the Checkbox control. Checkboxes are usually used when making forms, however, in this instance, they can also be used to create a checklist.
5 Steps for Creating a Microsoft Excel Checklist
By using the example of creating a ‘things to pack for a holiday’ checklist, we’ll show you how it’s done on Microsoft Excel.
Step 1: Turn on the Developer tab
Enabling the Developer tab is the first thing you must do when creating an Excel checklist. To do this, go to File and select Options, then under the ‘Excel options’ dialogue box, click ‘Customize Ribbon’, as well as ensure you check the box beside ‘Developer’ on the right side by clicking ‘Ok’. You should be able to see the ‘Developer’ tab on the Excel ribbon.
Step 2: Set tasks in Excel
Under the ‘Things to pack’ column, start listing the items that you will need for your holiday.
Step 3: Input checkboxes
Right next to the ‘Things to pack’ column, we need to add Checkboxes. To do this, click on ‘Developer’, select ‘Insert’, and click the Checkbox icon under ‘Form Controls’. Then, click on the cell where the Checkbox will be placed. There may be some text that was added with the Checkbox. To remove this, simply right-click on the Checkbox, then ‘Edit Text’, and then delete the text.
Step 4: Appoint a cell to each Checkbox
In order for the values True and False to be shown when we tick and untick a Checkbox, a cell needs to be assigned to each Checkbox. Right-click on the Checkbox, then select ‘Formal Control’. Then, in the dialogue box under the ‘Control’ tab, input the address of the cell in the ‘Cell link’ box which you want to assign to the Checkbox.
Step 5: Don’t forget to apply conditional formatting!
And finally, for your Microsoft Excel checklist to be complete, ensure you apply conditional formatting. Select the tasks on your ‘Things to pack column’, then click on ‘Conditional Formatting’ found under the ‘Home’ tab, and click on ‘New Rule’. Select the rule type as ‘Use a formula to determine which cells to format’. In the condition textbox, you need to check the value of the cell which gets updated when the checkbox is ticked as True or False.
The next thing to do is to select the ‘Format’ button, then click ‘Strikethrough’ under ‘Effects’, select a red colour from the ‘Color’ dropdown, and press ‘Ok’. Repeat this for every task on your list. Make sure you hide the column that gets updated for every tick and untick a Checkbox so that your Excel spreadsheet only shows the item list and the checkboxes. Voila, your checklist is done!
Using Microsoft Excel to create a checklist does require a few steps to get right, but if you were after an electronic checklist that doesn’t require so much faffing about, there are software programs that allow you to do so in one simple click (literally!).
How to Create a Checklist with Zenkit
Zenkit is a project management tool that comes with many features designed to help improve the efficiency and productivity of you and your team. While a popular product to use professionally, it is also super handy to use when it comes to things within your personal life, like creating a checklist for things to pack for a holiday. Here’s how:
Create a new Collection and title it ‘Things to pack’. Once that’s done, start listing the items that you need. The recommended view is the ‘List view’, however, you do have the option of turning every view — except the Table view — into a checklist.
When checking items off your checklist, the item that has been marked as ‘checked’ will automatically move to the bottom of the list so that the unticked items have been prioritized to the top.
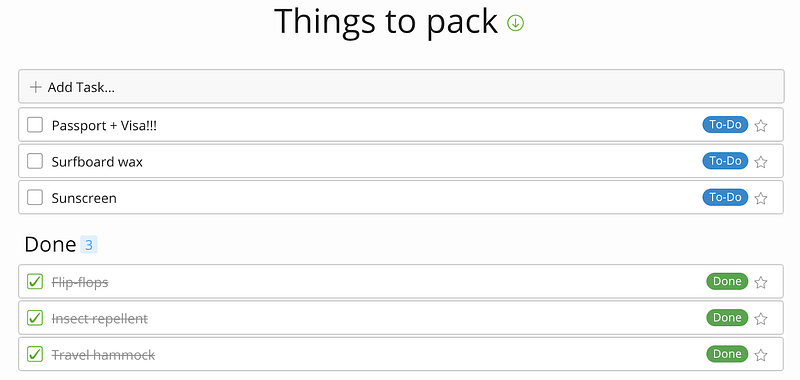
And, that’s pretty much it. The beauty of creating checklists with Zenkit is that it basically takes only one step to complete. You can turn any collection into a checklist by enabling the ‘Task List’ add-on. (Click here to see how.)
Final Thoughts
Whether created using Microsoft Excel, Zenkit, or just a pen and paper, there’s no doubt that checklists are the perfect tool to use in situations where it’s imperative to not forget an item or a task.
What do you use checklists for?
Cheers,
Dinnie and the Zenkit team


Leave a Reply