
Finally see how to stop getting stuck in a project management tool
Book a Live Demo20 min. personalized consultation with a project management expert
Collaborate with Access Control and Password Restriction
Take control of your workspaces for smoother collaborations.
Access Control is a revolutionary approach to collaborative work.
For the examples we list below, we will be working with Zenkit Base. However, Access Control is also available in Projects, To Do, and Zenforms. It will also soon be added to Hypernotes.
What Is Access Control?
Access Control, as the name suggests, is an intuitive way of controlling third-party access to your workspace, whether this be your Projects, Collections, Forms, or Lists.
There are many layers to Access Control. However, in essence, the Collection Owner can control what aspects of the Collection other Collection members can both view and interact with.
How to Set Up Access Control
Access Control can easily be set up by first clicking on one of the members working in your Collection. The quickest way to do this is to click the “Member Icon” at the top of the screen. This will lead to a drop-down menu showing all the members currently added to your Collection. Otherwise, you can access all members by going to your Collection settings and clicking “Access”.
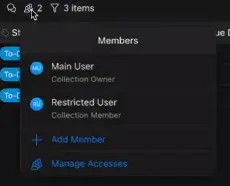
Next, click the Collection Member to whom you’d like to apply Access Control. This will then open another menu displaying all the possible roles your team member can play in your Collection.
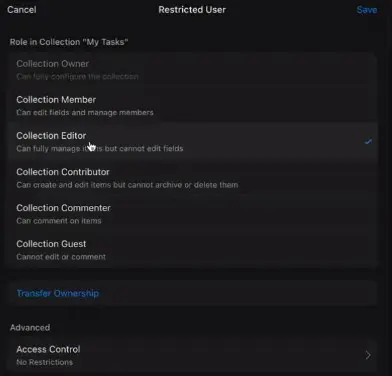
For those with a paid plan, the Access Control feature can be accessed at the bottom of this menu.
When setting up Access Control as a Collection Owner, it’s important to remember that the feature will not work for any team member who is assigned to the role of “Collection Member”. The reason for this is that this Collection role can edit Collections freely. As such, this role would supersede the use of Access Control since they can remove their Access Control just as easily as they can apply it to others.
By assigning your team member as an “Editor”, “Contributor”, “Commenter”, or “Guest”, you will unlock the Access Control functionality at the bottom of the menu.
Access Control Examples
There are many uses for Access Control, and we detail some ways in which this new feature works below.
Show or Hide Fields
Using the field toggle function, the Collection Owner can easily switch between selecting fields to hide from their team member or to have shown.
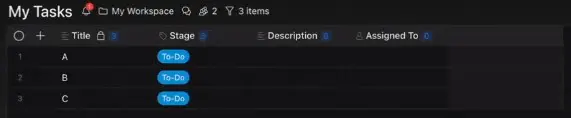
An example of this can be seen below when working with the Table View in Base.
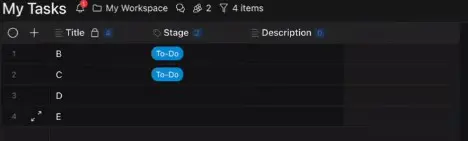
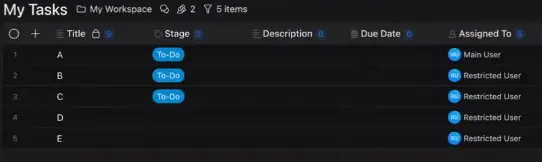
This is an example view seen by our “Restricted User” before the Collection Owner (called “Main User” in this example) uses Access Control to restrict what they can and can’t see. It is important to note that the Collection Owner will continue to see this view even after restricting a team member’s Collection access.

The Collection Member has decided that this member should not be able to view the “Due Date” and “Attachments” fields. Nor can they make any changes to the Collection such as adding new fields or making any major alterations to the pre-existing table (otherwise, that would defeat the purpose of Access Control!).
More Advanced Field Filtering
There are a lot of ways in which field filters can be used to ensure your team members get the correct view of your work. Obviously, the use of these filters will differ depending on your needs. Nevertheless, there are some simple ways in which you can improve how you use them.
A great example of this is hiding (or showing) certain labels, rather than just the fields (as illustrated in the example above). Let’s demonstrate how this works with the “Assigned To” field.

Instead of showing all members in the “Assigned To” field, we’ll alter the filtering so that it will only display the tasks assigned to our “Restricted User”.

As you can see, the “Restricted User” can only see their assigned tasks. However, they are also able to create new tasks. If they decide to do so, a new task will be created and automatically label them in the “Assigned To” field.
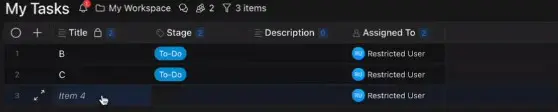
With this example, it is important to note that should the Collection Owner have made the “Assigned To” field hidden from our “Restricted User”, any new task created by the “Restricted User” will automatically tag their name to the “Assigned To” field that is visible in the Collection Owner’s Table View.
Here you can see that the “Restricted User” has created two new tasks, but they cannot see the “Assigned To” field.
However, the Collection Owner can see from their Table View who has created these new tasks.
Password Restriction
The final aspect of Access Control is its Password Restriction feature.
Again, as its name suggests, Password Restriction limits access to your Collections with a password.
The Password Restriction feature can be found by accessing your Collection settings and clicking “Access”. Within this space, you will be given an overview of your workspace visibility, Collection members, and finally the Password Restriction.
Please note, the Password Restriction feature is only available as part of a paid plan.
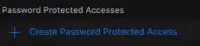
From here, you will be given the opportunity to create a new password.
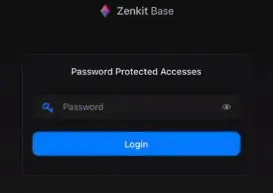
Now, Collection Members will only be able to access your Collection should they have the password.
Final Thoughts
By combining the use of Access Control and Password Restriction, you are given a greater sense of control over your workspace.
These features are not only a great way to speed up collaboration, but they can also enhance everyone’s workflow.
What do you think of our latest features? Have you had the chance to try them out yet?
Leave your comments below!
Access Control and Password Restriction are available for Zenkit Base, To Do, Projects, and Zenforms. They will also soon be available in Hypernotes.
Access Control and Password Restriction are paid plan features available for Plus Plan members and higher.
FREE 20 MIN. CONSULTATION WITH A PROJECT MANAGEMENT EXPERT
Wanna see how to simplify your workflow with Zenkit in less than a day?
Book a Live Demo